
Locking Files and Folders
Use Cases
Locks can be used in multiple ways to improve and support collaboration in Team Shares. For example:
1. Temporarily Lock a Single File
a. When editing a file in a Team Share, the locking feature can be used to temporarily set read-only permissions on the file, preventing other Team Share subscribers from making changes and overwriting your work. The Auto-Locking and Lock For options allow you to automatically expire a lock after a certain time period.
2. Permanently Lock a Single File
a. In some instances, a certain Team Share file might need to be shared with—but never edited by—subscribers. For example, you might decide to set a permanent lock on a form or a template so that it can never be edited or deleted.
3. Lock an Entire Folder or Team Share
a. Not only can you lock an individual file, but you can also place a lock on a folder or a Team Share. For example, you might decide to dedicate an entire Team Share—or a subfolder within a Team Share—to read-only information, such as HR forms.
Auto Locking Team Share Content
If the Auto Lock Word/Excel feature is turned on for a Team Share, the system will prompt users to lock files each time an item is opened. Administrators must turn on this feature for each individual Team Share.
When working with the Auto Lock Word/Excel feature:
1. Click to open a Word or Excel file in a Team Share. You will be presented with a dialog box that will prompt you to lock the file.

2. Click the Lock the document radio button to confirm the lock, and to enforce the lock while you are working on the file. You can also select a maximum lock time period in the Max Lock Duration drop-down menu to determine how long the auto-lock will be in effect. You can select from 1 hour (default), 2 hours, 4 hours, or 8 hours. After the time period has expired, the auto-lock will expire.
3. Click the Don’t lock the document radio button to keep the file unlocked. Remember that when you make changes to an unlocked file, you might encounter instances where another user makes changes to the same file at the same time, which will cause a file sync conflict. For information on file sync warnings, please reference the Manually Resolving a File Sync Warning Knowledgebase article.
4. Optionally, click the Change Future Behavior link to configure personal preferences for locking files.
5. Click the OK button to confirm your preference, and then edit your file as appropriate. When you close the file, it will automatically unlock, and will then sync to then server
Manually Locking Team Share Content (Setting Read-Only Permissions)
To manually lock files and folders in the desktop client:
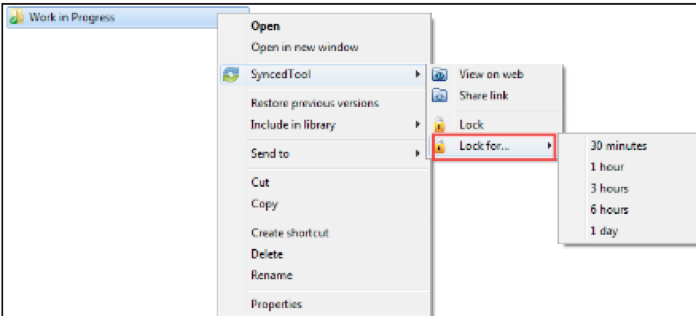
1. In the desktop client, right-click the Team Share item, point to the sync menu, and select Lock.
2. Alternatively, to lock the folder or file for a specific amount of time, point to Lock for, and select a time period, including: 30 minutes, 1 hour, 3 hours, 6 hours, or 1 day. When you utilize this option, you won’t need to remember to manually unlock the file or folder.
To manually lock a file or folder in the web portal:
1. In the web portal, right-click the item, and select lock. The item is now locked, and is read-only for everyone else in the share.
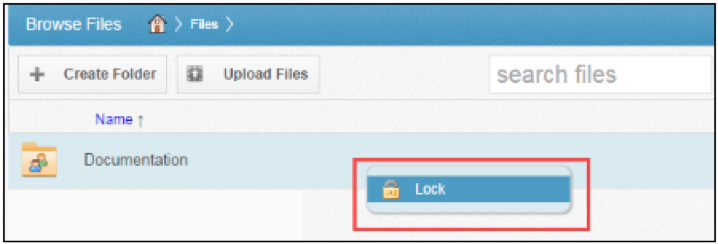
2. When you are finished editing, you must unlock the item. To unlock the item, right-click the file or folder again, and select unlock
Viewing Information About a Locked File
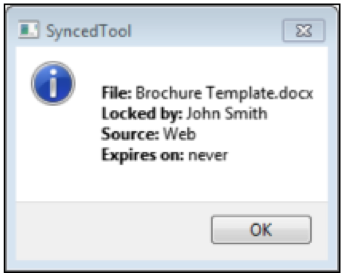
When you are working in the desktop client, you will see a lock icon displayed over a file or folder when it has been locked by you or another Team Share subscriber. Optionally, you can view information about who locked the file or folder.
1. In the desktop client, right-click the Team Share item, point to the sync menu, and select Lock Info. A dialog box displays, giving you information about who locked the item, where the item was locked, and when the lock expires.
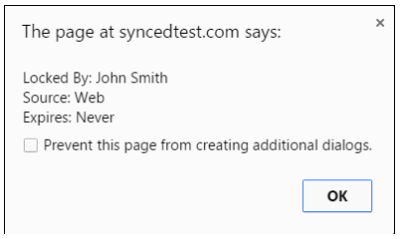
When you are working in the web portal, you can view this same information about who locked the file or folder.
1. In the web portal, right-click the item, and select Lock Info. A pop-up window displays, giving you information about who locked the item, where the item was locked, and when the lock expires.
Viewing a Locked File
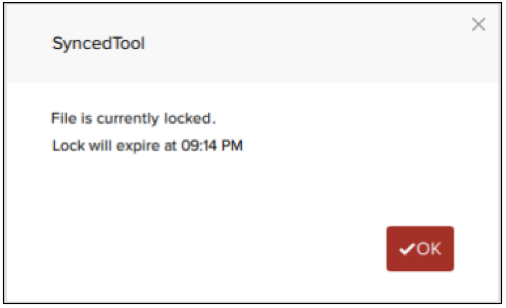
If hard locks are enabled, and a user opens an already-locked file, he or she will be presented with a pop-up notification.
1. When attempting to edit a Microsoft Word 2013 or Microsoft Excel 2013 locked file, offending users will need to actively clear the read-only notification before they can edit a file. Older versions of Microsoft Word, however, will only display a read-only notification in the toolbar area. It is important to be mindful when working in Team Shares, and to pay attention to display indicators and warning messages.
If this user ignores the warning, and attempts to save changes, he or she will receive a warning message and be prompted to save the file with a different name.